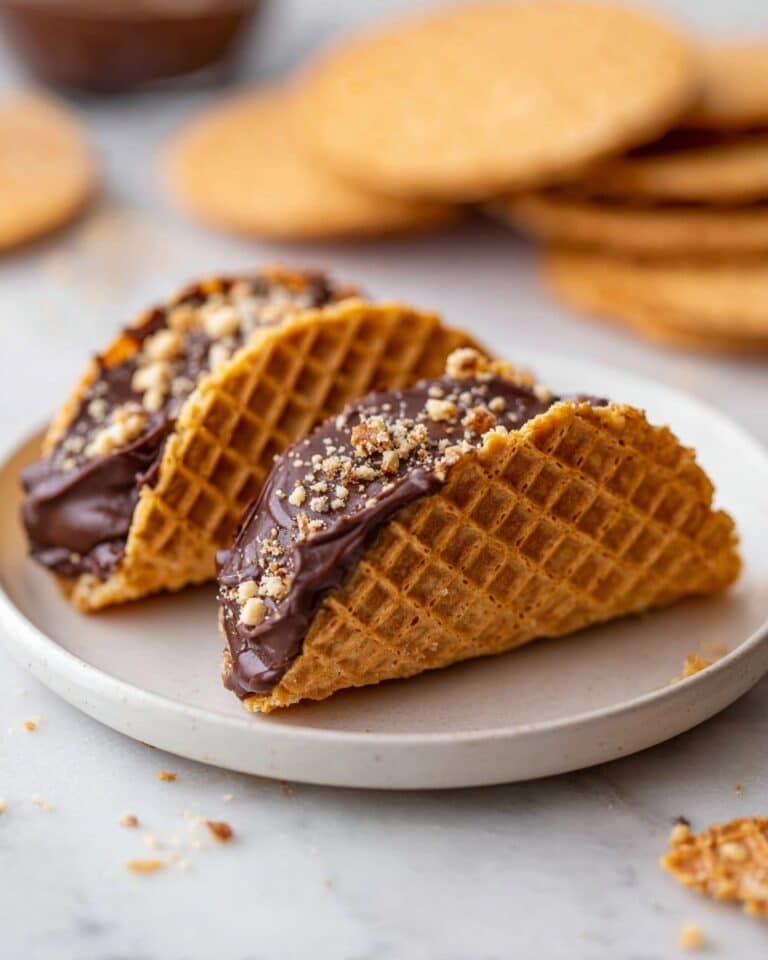
Campfire Cones Recipe
If you’re searching for an irresistibly easy and wildly fun treat to brighten any outdoor adventure, Campfire Cones are about to become your new obsession. Imagine the magic of melty marshmallows, rich chocolate, and bursts of juicy fruit all cradled in a crisp waffle cone. Whether you’re huddled by the fire with friends or looking for a playful twist on traditional s’mores, Campfire Cones bring everyone together with minimal fuss and maximum flavor. Trust me, there’s just something unforgettable about the gooey, chocolatey surprise in every bite of these cones.

Ingredients You’ll Need
One of the greatest joys of making Campfire Cones is how incredibly simple the shopping list is, and yet, each ingredient plays a crucial role. Every add-in brings its own texture, sweetness, or burst of color, resulting in decadent, handheld desserts that are as fun to build as they are to eat.
- Waffle cone: This sturdy, sweet cone forms the perfect vessel for all your gooey, melty fillings and keeps everything deliciously contained.
- Mini marshmallows: These melt into fluffy clouds, binding your fillings together and oozing out of the cone in the most delightful way.
- Chocolate chips: Choose your favorite (milk, semi-sweet, or dark) for melty pockets of rich chocolate throughout every bite.
- Banana: Sliced banana adds creaminess and extra sweetness that balances the chocolate and marshmallows beautifully.
- Strawberries: These bring a pop of color and tangy freshness that keeps each mouthful exciting and bright.
- Raspberries: Each raspberry offers a juicy, tart surprise and really takes your Campfire Cones to the next level.
How to Make Campfire Cones
Step 1: Prepare the Cone Base
Start by dropping a few mini marshmallows into the tip of your waffle cone. This important step ensures that none of your melty chocolate or gooey filling escapes from the bottom while your cones toast over the fire. Plus, it gives you a sweet surprise at the end.
Step 2: Fill with Your Favorites
Now comes the fun part! Gently layer your banana slices, strawberries, raspberries, more mini marshmallows, and plenty of chocolate chips—alternating as you wish—until the cone is stuffed to the brim. Press everything in lightly to maximize the filling without breaking the cone.
Step 3: Heap It High
Don’t be shy! Pile your ingredients so they mound a little over the top. The marshmallows will melt down as they heat, so packing them generously gives you a gloriously gooey end result.
Step 4: Wrap in Foil
Completely wrap each loaded cone in a piece of tin foil, folding the edges tightly to keep everything secure. The foil protects your Campfire Cones from the flames and lets all the ingredients melt together while keeping the cone crisp.
Step 5: Grill or Roast Over the Fire
Set your cones on a grill grate over the campfire, or nestle them in the embers for three to five minutes. You’ll know they’re ready when the chocolate is melty and the marshmallows puff up beautifully. Rotate the cones for even heating if needed.
Step 6: Unwrap and Enjoy!
Carefully unwrap the foil—steam is hot!—and let everyone dig in while the cones are still warm and gooey. Revel in the toasty marshmallow aroma and the wonderful messiness of it all. Dig in with your fingers and plenty of napkins!
How to Serve Campfire Cones

Garnishes
Add a dollop of whipped cream or a drizzle of caramel sauce to your finished Campfire Cones for extra flair. A sprinkle of crushed graham crackers or rainbow sprinkles amps up the fun, especially for kids (and let’s be honest, for excited grown-ups too!).
Side Dishes
Pair your Campfire Cones with fresh fruit skewers, a platter of assorted nuts, or even a cold glass of milk for the full campfire dessert experience. These cones are so decadent, a simple side is all you need to balance the treat.
Creative Ways to Present
Serve your cones upright in mason jars or small cups, or create a “build-your-own” Campfire Cones bar with bowls of different toppings. Guests can mix-and-match fillings to personalize their cone, turning dessert into a tasty adventure for everyone.
Make Ahead and Storage
Storing Leftovers
If you happen to have any leftovers (which is rare!), individually wrap the Campfire Cones in foil and keep them in the fridge. Enjoy them cold for a chewy, crunchy snack or reheat as needed for another gooey round.
Freezing
Although best enjoyed fresh, you can freeze assembled but uncooked cones wrapped tightly in foil. When the craving hits, simply place them on the campfire or grill directly from the freezer, adding an extra minute or two to the reheating time.
Reheating
To recapture the original melty magic, reheat refrigerated or frozen Campfire Cones in their foil either over medium-low grill heat or in a 350°F oven for five to ten minutes. Be sure to let them cool slightly before eating, as the center will be piping hot.
FAQs
Can I use other types of fruit or fillings in my Campfire Cones?
Absolutely! Campfire Cones are endlessly customizable. Try blueberries, pineapple, chopped nuts, coconut flakes, peanut butter chips, or even cookie crumbs. Mix and match for your own signature cone!
Do I need a campfire, or can I make these at home?
No campfire? No problem! You can prepare Campfire Cones right in your oven or on a grill at home. Simply place the foil-wrapped cones directly on the rack and heat until melty and delicious.
How do I keep the cones from getting soggy?
Stuffing marshmallows into the cone tip forms a barrier to keep fillings from leaking, and wrapping in foil helps retain crispness. For best texture, enjoy your Campfire Cones while they’re still warm and freshly unwrapped.
Are waffle cones the only option?
Waffle cones are ideal due to their strength and sweetness, but you can experiment with sugar cones or even sturdy pretzel cones if you’re feeling adventurous. Just avoid regular cake cones, which tend to fall apart from the heat and moisture.
Is there a way to make Campfire Cones less sweet?
If you prefer a less-sweet treat, use dark chocolate chips, add more fresh fruit, or even sneak in a spoonful of creamy nut butter. The beauty of Campfire Cones is how easy they are to tailor to every taste.
Final Thoughts
Campfire Cones are the ultimate crowd-pleaser—just the right blend of nostalgic campfire fun and treat-yourself indulgence. Whether you’re camping under the stars or simply craving a taste of summer by the backyard grill, you’re just minutes away from pure dessert happiness. Gather your favorite people, assemble those cones, and let the gooey magic begin!
Print
Campfire Cones Recipe
- Total Time: 15 minutes
- Yield: 1 serving 1x
- Diet: Vegetarian
Description
Campfire Cones are a fun and delicious treat perfect for outdoor gatherings. These sweet cones are filled with gooey marshmallows, chocolate chips, and a medley of fresh fruits, all melted together into a delightful mess of flavors. A must-try for any camping adventure!
Ingredients
Ingredients:
- 1 Waffle cone
- 1/4 cup Mini marshmallows
- 1/4 cup Chocolate chips
- 1/4 Banana
- 5 Strawberries
- 10 Raspberries
Instructions
- Place mini marshmallows in the bottom of the cone: This step is crucial to prevent the chocolate from leaking out.
- Fill the cone with ingredients: Stuff the cone with marshmallows, chocolate chips, banana slices, strawberries, and raspberries.
- Pack the ingredients tightly: Ensure the cone is filled to the brim as the marshmallows will melt down.
- Wrap the cone in foil: Completely cover the cone in aluminum foil.
- Grill the cone: Cook over a campfire or grill for 3-5 minutes.
- Unwrap and enjoy: Carefully open the foil and indulge in the gooey goodness!
- Prep Time: 10 minutes
- Cook Time: 5 minutes
- Category: Dessert
- Method: Grilling
- Cuisine: Outdoor
Nutrition
- Serving Size: 1 cone
- Calories: Approximately 250 kcal
- Sugar: 15g
- Sodium: 50mg
- Fat: 8g
- Saturated Fat: 4g
- Unsaturated Fat: 3g
- Trans Fat: 0g
- Carbohydrates: 40g
- Fiber: 4g
- Protein: 2g
- Cholesterol: 0mg
Keywords: Campfire Cones, Campfire Dessert, Outdoor Cooking, Marshmallow Treat

