Flourless Chocolate Hazelnut Brownies Recipe
Introduction
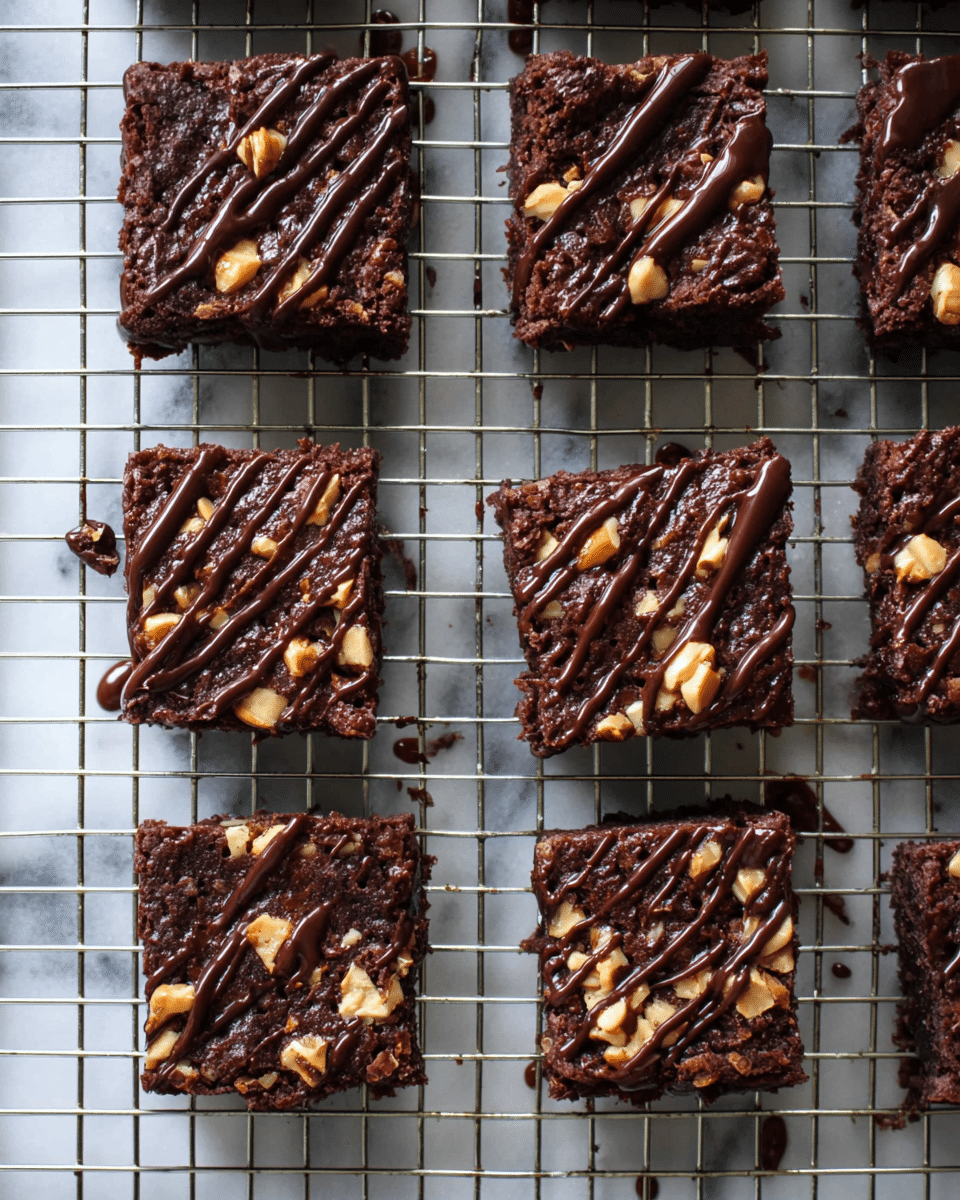
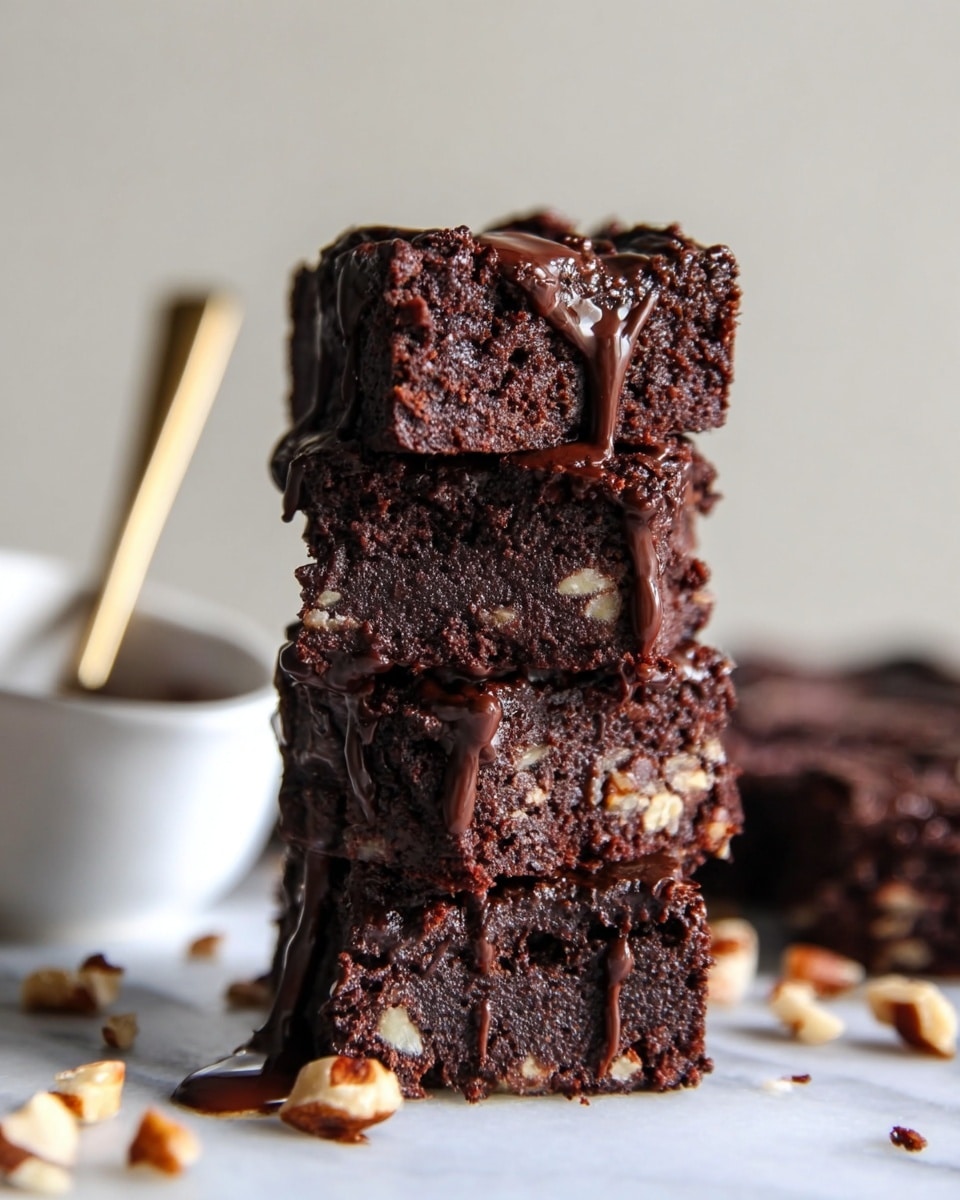
These Flourless Chocolate Hazelnut Brownies are rich, fudgy, and packed with nutty flavor. They offer an indulgent treat for chocolate lovers that’s naturally gluten-free and irresistibly delicious. Perfect for any occasion, these brownies combine the deep taste of dark chocolate with the crunch of hazelnuts.
Ingredients
- 1 1/4 cups hazelnut meal (hazelnuts ground into a flour in the food processor), plus 1/4 cup coarsely chopped hazelnuts
- 1/3 cup unsweetened cocoa powder
- 1/2 teaspoon salt
- 1 teaspoon espresso powder
- 1 cup (2 sticks) unsalted butter, cut into chunks
- 6 ounces dark chocolate, chopped
- 3 ounces dark chocolate, melted (for drizzling)
- 1 cup granulated sugar
- 3 large eggs
- 2 teaspoons vanilla extract
Instructions
- Step 1: Preheat your oven to 350℉. Line an 8×8 inch square baking dish with parchment paper or foil and set it aside.
- Step 2: In a medium bowl, combine the hazelnut meal, cocoa powder, salt, and espresso powder. Whisk these dry ingredients together until evenly mixed.
- Step 3: Melt the butter and chopped dark chocolate in a microwave-safe bowl. Heat in 30-second intervals, stirring between each, until fully melted and smooth. Let the mixture cool slightly.
- Step 4: Whisk the melted butter and chocolate mixture together with the sugar, eggs, and vanilla extract until the batter is smooth and well combined.
- Step 5: Gently fold the hazelnut mixture into the wet ingredients until just combined. Pour the batter into the prepared baking dish and sprinkle the coarsely chopped hazelnuts evenly over the top.
- Step 6: Bake for about 40 minutes. The edges should be firm while the center remains slightly loose — these brownies are delicate when warm.
- Step 7: Allow the brownies to cool completely in the pan, preferably overnight. Once cooled, drizzle the melted dark chocolate over the top before serving.
Tips & Variations
- Use freshly ground hazelnuts for the best flavor and texture. To toast them beforehand enhances the nutty aroma.
- Espresso powder enhances the chocolate flavor but can be omitted if preferred.
- Try adding a pinch of cinnamon or chili powder for a unique twist.
- For extra crunch, mix some chopped toasted hazelnuts directly into the batter.
Storage
Store these brownies in an airtight container at room temperature for up to 3 days or in the refrigerator for up to a week. To reheat, warm gently in the microwave for about 10 seconds to soften without melting the chocolate drizzle. These brownies can also be frozen for up to 2 months; thaw overnight in the fridge before serving.
How to Serve
Serve this delicious recipe with your favorite sides.
FAQs
Can I substitute hazelnut meal with almond flour?
Yes, almond flour can be used as a substitute, but the flavor will be different. Hazelnut meal gives a unique, rich taste that complements the chocolate especially well.
Are these brownies suitable for a gluten-free diet?
Absolutely. Since this recipe uses hazelnut meal instead of flour, it is naturally gluten-free. Just ensure your cocoa powder and other ingredients are certified gluten-free if sensitivity is a concern.
Print
Flourless Chocolate Hazelnut Brownies Recipe
- Total Time: 55 minutes
- Yield: 9 brownies (8×8 inch pan size, cut into 3x3 grid) 1x
- Diet: Gluten Free
Description
These Flourless Chocolate Hazelnut Brownies are rich, fudgy, and packed with the nutty flavor of hazelnuts combined with intense dark chocolate. Naturally gluten-free due to the absence of flour, these decadent brownies feature a crunchy hazelnut topping and a luscious melted chocolate drizzle, perfect for satisfying any chocolate craving.
Ingredients
Dry Ingredients
- 1 1/4 cups hazelnut meal (hazelnuts ground into a flour in the food processor)
- 1/4 cup coarsely chopped hazelnuts
- 1/3 cup unsweetened cocoa powder
- 1/2 teaspoon salt
- 1 teaspoon espresso powder
Wet Ingredients
- 1 cup (2 sticks) unsalted butter, cut into chunks
- 6 ounces dark chocolate, chopped (77% cacao recommended)
- 1 cup granulated sugar
- 3 large eggs
- 2 teaspoons vanilla extract
For Drizzling
- 3 ounces dark chocolate, melted (77% cacao recommended)
Instructions
- Preheat Oven and Prepare Pan: Preheat your oven to 350℉ (175℃). Line an 8×8 inch square baking dish with parchment paper or foil, allowing some overhang for easy removal of the brownies after baking. Set aside.
- Combine Dry Ingredients: In a medium bowl, whisk together the hazelnut meal, unsweetened cocoa powder, salt, and espresso powder until evenly blended. This mixture adds flavor depth and texture to your brownies.
- Melt Butter and Chocolate: Place the butter and chopped dark chocolate in a microwave-safe bowl. Heat in 30-second increments, stirring thoroughly between each session, until completely melted and smooth. This usually takes about 1 1/2 minutes total. Allow the mixture to cool slightly to avoid cooking the eggs in the next step.
- Mix Wet Ingredients: In a separate bowl, whisk together the granulated sugar, eggs, and vanilla extract until combined and slightly thickened. Then incorporate the cooled butter and chocolate mixture, whisking until the batter is smooth and glossy.
- Add Dry to Wet: Gently fold the hazelnut meal mixture into the wet ingredients, mixing just until combined to avoid overworking the batter. Pour the batter into the prepared baking pan and evenly sprinkle the coarsely chopped hazelnuts over the top to add a delightful crunch.
- Bake the Brownies: Place the pan in the preheated oven and bake for about 40 minutes. The brownies are done when the edges are firm but the center is still slightly loose and fudgy. Be careful not to overbake as the brownies are delicate when warm.
- Cool and Drizzle: Allow the brownies to cool completely in the pan, ideally overnight, to firm up for easy slicing. Once cooled, drizzle the melted dark chocolate over the top in an elegant pattern. Serve and enjoy!
Notes
- Ensure the butter and chocolate mixture cools slightly before mixing with eggs to prevent curdling.
- For a more intense hazelnut flavor, toast the hazelnuts lightly before grinding into meal.
- The brownies are delicate when warm; cooling completely before cutting ensures clean slices.
- You can substitute the granulated sugar with coconut sugar for a deeper sweetness and a hint of caramel.
- Store brownies in an airtight container at room temperature for up to 3 days or refrigerate for up to a week.
- Prep Time: 15 minutes
- Cook Time: 40 minutes
- Category: Dessert
- Method: Baking
- Cuisine: American
Keywords: flourless, chocolate, hazelnut, brownies, gluten free, dessert, fudgy, dark chocolate, nutty


