Description
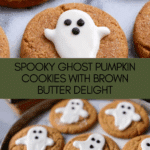
Create festive and fun Spooky Ghost Brown Butter Pumpkin Cookies perfect for Halloween or autumn celebrations. These chewy pumpkin cookies are topped with smooth white chocolate shaped like ghosts and detailed with black candy melts for spooky eyes and mouths. A delightful treat combining rich brown butter and maple flavors with playful ghostly decorations.
Ingredients
Scale
Cookies
- 1 batch Brown Butter and Maple Chewy Pumpkin Cookies (prepared and baked)
Decorations
- White chocolate melting wafers (e.g., Ghirardelli)
- Black candy melts
Equipment
- Piping bag or ziplock bag
- Medium cookie scoop
- Light colored baking pans
- Microwave-safe container
- Small spoon
Instructions
- Bake the Cookies: Prepare the Brown Butter and Maple Chewy Pumpkin Cookies according to the recipe instructions. Bake them in light-colored baking pans and allow the cookies to fully cool before decorating to ensure the chocolate decorations adhere properly.
- Melt the White Chocolate: Using a microwave or double boiler, melt the white chocolate melting wafers until smooth, stirring occasionally to avoid burning.
- Apply the Ghost Base: Spoon a small dollop of the melted white chocolate onto the center of each cooled cookie. Using the back of a small spoon, apply gentle pressure and drag the chocolate down to create a ghost shape. It’s helpful to practice this dragging technique on parchment paper before decorating the cookies to perfect the shape.
- Let White Chocolate Harden: Allow the white chocolate ghost shapes to harden completely at room temperature or in the refrigerator for faster setting.
- Melt the Black Candy Melts: Melt the black candy melts in a microwave-safe container in short bursts, stirring between intervals until fully melted and smooth.
- Prepare the Piping Bag: Pour the melted black candy melts into a piping bag or a ziplock bag with a small corner snipped off. This will be used to pipe the eyes and mouths.
- Pipe the Ghost Faces: Carefully pipe small dots for eyes and a mouth onto each ghost-shaped white chocolate area to create spooky faces.
- Allow Candy Melts to Dry: Let the black candy melts dry completely at room temperature before handling or serving to ensure the decorations stay intact.
- Enjoy: Your spooky ghost pumpkin cookies are ready to serve. Store in an airtight container to maintain freshness.
Notes
- Practice dragging the white chocolate on parchment paper first to perfect the ghost shape before decorating the cookies.
- Use light-colored baking pans to prevent cookies from browning too much, maintaining an even color.
- Make sure cookies are completely cool before decorating, or the melted chocolate may melt the cookie surface.
- If candy melts are hard to pipe, reheat gently to soften without overheating.
- Store decorated cookies in an airtight container at room temperature for up to 3-4 days.
- Prep Time: 25 minutes
- Cook Time: 12 minutes
- Category: Dessert
- Method: Baking
- Cuisine: American
Keywords: pumpkin cookies, halloween cookies, brown butter cookies, ghost cookies, white chocolate decoration, candy melts, fall cookies, seasonal baking